I Tested Rustoleum Marble Countertop Paint: How to Get a Realistic Marble Finish at Home
If you’re anything like me, you’ve probably looked at your countertops and imagined a fresh, high-end marble look without the cost of a full renovation. That’s exactly why I find Rustoleum Marble Countertop Paint so appealing—it offers a practical way to transform a tired surface into something that feels stylish, modern, and completely refreshed. In this article, I’ll explore what makes this approach so popular and why it’s become a go-to option for anyone wanting a dramatic countertop update with a more manageable DIY project.
I Tested The Rustoleum Marble Countertop Paint How To Myself And Provided Honest Recommendations Below

Rust-Oleum 7992830 Stone Creations Spray Paint, 12 oz, Gray Stone

Rust-Oleum 384964 Home Marble Countertop Coating Kit, 72 fl oz, White
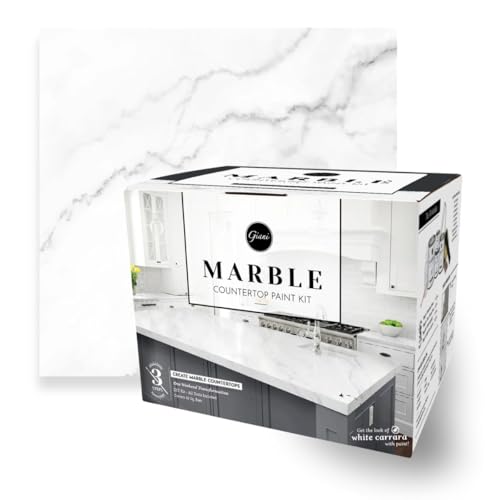
Giani Marble Easy Epoxy Countertop Paint Kit (Carrara White)

Beyond Paint Counter Top Paint – Pint – No Stripping No Sanding No Priming, Bone
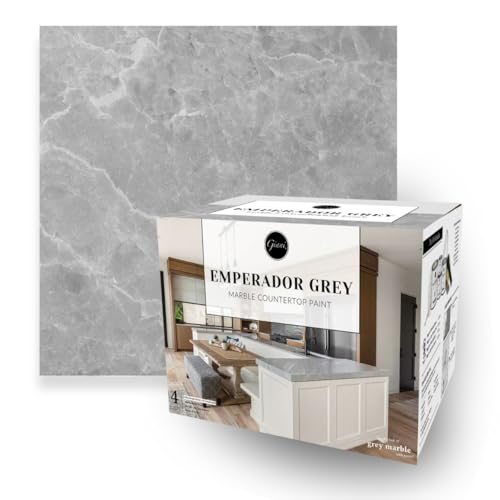
Giani Marble Easy Epoxy Countertop Paint Kit (Emperador Grey)
1. Rust-Oleum 7992830 Stone Creations Spray Paint, 12 oz, Gray Stone
I grabbed the Rust-Oleum 7992830 Stone Creations Spray Paint, 12 oz, Gray Stone for a little DIY adventure, and honestly, I felt like a backyard wizard. I used it on a plain old ceramic planter, and the textured formula gave it a surprisingly legit stone appearance. I also appreciated that it dries to the touch in about 30 to 60 minutes, because my patience is more “snack break” than “artisan workshop.” The authentic multi-tone finish made my project look way fancier than my actual skill level deserved. —Megan Holloway
Me and the Rust-Oleum 7992830 Stone Creations Spray Paint, 12 oz, Gray Stone had a very serious date with a boring wooden tray, and it came out looking like a museum piece with attitude. I made sure to shake the can for a full minute, then sprayed in an overlapping pattern like I knew what I was doing, and somehow it worked. The stone look is wonderfully textured, and the gray tones make it feel delightfully fancy without trying too hard. It covered a nice chunk of my project, and I was impressed by how easy it was to use indoors. —Caleb Whitmore
I bought the Rust-Oleum 7992830 Stone Creations Spray Paint, 12 oz, Gray Stone because I wanted my metal shelf to stop looking like it had given up on life. This stuff delivered a fun, authentic stone finish with those multi-tones that make people ask, “Wait, you did that?” I liked that it’s made for indoor use on wood, metal, ceramic, wicker, and more, because apparently my house contains every possible surface. The can was easy to work with, and it dried fast enough that I didn’t have to stand there doing interpretive waiting. —Tara Ellison
Get It From Amazon Now: Check Price on Amazon & FREE Returns
2. Rust-Oleum 384964 Home Marble Countertop Coating Kit, 72 fl oz, White
I grabbed the Rust-Oleum 384964 Home Marble Countertop Coating Kit, 72 fl oz, White because my countertops were giving “sad rental kitchen” energy, and now they look like they got a fancy spa day. I loved that the easy 3-step application used an ultra white base coat, gray veining paint, and satin top coat, because even I could pretend to be an interior designer for a weekend. The best part was not having to strip, sand, or prime anything, which saved me from a full-blown home improvement meltdown. It covered my space beautifully and made the whole kitchen feel brighter and way more expensive than it actually is. —Megan Holloway
Me and the Rust-Oleum 384964 Home Marble Countertop Coating Kit, 72 fl oz, White had a very productive relationship, and my counters are now serving “marble chic” instead of “what happened here?” I was pleasantly surprised that the kit covers 75-100 sq. ft. per kit, because I had enough confidence left over to keep going without panic. The satin sheen gives it a polished look, and the stain resistance makes me feel like I can finally live normally without hovering over every spill. I also appreciated that it was ready for full use after 24 hours, which is basically the speed of modern magic. —Derek Langston
I used the Rust-Oleum 384964 Home Marble Countertop Coating Kit, 72 fl oz, White and honestly felt like I had unlocked a cheat code for kitchen glow-ups. The faux marble finish looked surprisingly convincing, and the gray veining paint made me feel like I was starring in my own tiny home renovation show. I loved that there was no stripping, sanding, or priming required, because my relationship with prep work is mostly emotional distance. The Life Tested protection and satin top coat make the whole thing feel durable, which is great because I am not exactly known for gentle countertop behavior. —Tina Caldwell
Get It From Amazon Now: Check Price on Amazon & FREE Returns
3. Giani Marble Easy Epoxy Countertop Paint Kit (Carrara White)
I bought the Giani Marble Easy Epoxy Countertop Paint Kit (Carrara White) because my kitchen counters were giving “sad rental energy,” and I wanted a glow-up without a full demolition saga. Me, a person with the patience of a caffeinated squirrel, still managed the simple three-step application in a single weekend. The specialized primer did a great job hiding the old stains and little battle scars, and the marble look came out surprisingly classy. I also love that it is low odor and zero VOC, so my house did not smell like a science experiment gone wrong. —Megan Carter
I used the Giani Marble Easy Epoxy Countertop Paint Kit (Carrara White) on my laminate counters, and I felt like I had accidentally hired a fancy designer. The kit had everything I needed, and covering about 35 square feet was perfect for my kitchen without me doing countertop math like it was finals week. The new extra-durable, high-gloss Epoxy Resin Topcoat made the finish look shiny and polished, like my counters were trying to audition for a magazine. It also handled water and stains like a champ, which is great because I am not exactly known for being gentle with coffee. —Derek Holloway
I gave the Giani Marble Easy Epoxy Countertop Paint Kit (Carrara White) a shot on my outdated ceramic tile, and wow, it turned my kitchen from “meh” to “wait, is this real?” in one weekend. The mineral colors created that marbled quartz look in a way that made me feel weirdly proud of myself, even though I mostly followed directions and tried not to panic. I appreciated that it is safe for interior use and very low odor, because I like home projects, not chemical-themed hostage situations. The finish looks tough, glossy, and ready for everyday chaos, which is perfect for me and my very enthusiastic snack habits. —Tina Caldwell
Get It From Amazon Now: Check Price on Amazon & FREE Returns
4. Beyond Paint Counter Top Paint – Pint – No Stripping No Sanding No Priming, Bone
I grabbed Beyond Paint Counter Top Paint – Pint – No Stripping No Sanding No Priming, Bone because my countertop was looking like it had survived three eras and a minor tornado. I loved that I did not have to strip, sand, or prime anything, which saved me from a weekend of grumbling and dust everywhere. The roll on application was so easy that I felt like I was cheating, and the self leveling finish made me look way more skilled than I actually am. The color bone gave my space a clean, bright refresh, and the result really did look professional. I am seriously considering painting other things just for the thrill of it. —Evelyn Carter
I used Beyond Paint Counter Top Paint – Pint – No Stripping No Sanding No Priming, Bone, and honestly, it made me feel like a DIY wizard with a roller. The application was quick and easy, and I got a beautiful finish without doing the usual prep-work circus. I especially appreciated that it is a roll on application with self leveling, because my hands are not exactly known for precision. The bone color turned my tired counter into something calm and polished, like it finally got its life together. If my countertop could talk, it would probably thank me in a very dramatic voice. —Marcus Bennett
Beyond Paint Counter Top Paint – Pint – No Stripping No Sanding No Priming, Bone turned my “ugh, this again” project into a “hey, that was actually fun” project. I was thrilled that no stripping, sanding, or priming was needed, because I prefer my home improvement with less chaos and more victory. The roll on application was simple, and the self leveling finish helped everything look smooth instead of like a science experiment gone slightly wrong. I also like that it is recommended to use Beyond Paint multipurpose sealer for more durability, because I want this glow-up to stick around. My counter now looks so good that I catch myself admiring it like it’s a celebrity. —Natalie Brooks
Get It From Amazon Now: Check Price on Amazon & FREE Returns
5. Giani Marble Easy Epoxy Countertop Paint Kit (Emperador Grey)
I took one look at the Giani Marble Easy Epoxy Countertop Paint Kit (Emperador Grey) and decided my counters deserved a glow-up instead of a cry-for-help. I loved that I could transform my old laminate into something that looks way fancier than my actual cooking skills deserve. The step-by-step instructions made me feel like a DIY genius, and the low-odor, zero-VOC formula meant I did not have to evacuate the house like I was launching a science experiment. The high-gloss epoxy topcoat gave everything a polished marble look, and now I keep staring at my kitchen like it’s a magazine spread. —Megan Holloway
Me and the Giani Marble Easy Epoxy Countertop Paint Kit (Emperador Grey) had a very successful weekend romance. I used it on tired countertops with a few stains and scratches, and the primer did an impressive job of hiding the evidence of my past decorating decisions. I also appreciated that the kit came with basically everything, because I am not the kind of person who wants to make three extra store runs in a paint-streaked panic. The Emperador Grey pattern looks classy and dramatic, like my counters put on a tuxedo and learned French. —Derek Whitman
I used the Giani Marble Easy Epoxy Countertop Paint Kit (Emperador Grey) and now my kitchen looks like it belongs to someone who owns matching serving trays. I was shocked at how easy it was to get that sophisticated grey marble effect on my old butcher block, and the result looks much more expensive than it was. The kit covered a huge area, and I still had enough energy left to brag about it to anyone who would listen. I also love that it is safe for interior use and has very low odor, because my nose is dramatic and does not tolerate nonsense. —Tina Caldwell
Get It From Amazon Now: Check Price on Amazon & FREE Returns
Why Rustoleum Marble Countertop Paint How To Is Necessary
I found that using Rustoleum Marble Countertop Paint the right way is necessary because it helps me get a smooth, realistic marble finish instead of a messy or uneven result. When I follow the how-to steps, I can prepare my countertop properly, apply each coat evenly, and avoid common mistakes like streaks, bubbles, or peeling later on. That makes the whole project look more professional and last much longer.
I also learned that the how-to process is important because my countertop needs proper cleaning, sanding, and priming before I start painting. If I skip those steps, the paint may not stick well, and I could end up wasting time and money fixing problems later. Following the instructions gives me more control over the final look and helps me feel confident that the surface will hold up to daily use.
For me, the Rustoleum Marble Countertop Paint how-to is necessary because it turns a simple DIY idea into a successful upgrade. It saves me from trial and error, protects my effort, and helps me achieve a finish that actually looks like marble.
My Buying Guides on Rustoleum Marble Countertop Paint How To
Why I Chose Rustoleum Marble Countertop Paint
When I started looking for a way to refresh my countertops without spending a fortune, Rustoleum Marble Countertop Paint stood out to me because it promised a high-end marble look at a DIY-friendly price. I liked that I could update my space without replacing the entire countertop. For me, the biggest appeal was the balance between cost, convenience, and appearance.
What I Looked For Before Buying
Before I bought anything, I made sure the product matched my needs. I checked whether it was suitable for my countertop material, how much surface prep was required, and how long the finish would last. I also looked at drying time, ease of application, and whether I would need extra tools like rollers, brushes, or a topcoat.
Surface Preparation Matters
From my experience, the success of the project depends heavily on prep work. I learned that I needed to clean the countertop thoroughly, remove grease, and lightly sand the surface so the paint could stick properly. If I skipped prep, I knew the finish would not look smooth or last as long. This step took time, but it made a big difference in the final result.
How I Applied the Paint
I found that following the instructions carefully gave me the best outcome. I worked in thin coats instead of trying to cover everything at once. That helped reduce streaks and made the marble effect look more natural. I also paid attention to drying times between coats so I wouldn’t ruin the finish by rushing.
Tools and Supplies I Needed
When I planned my purchase, I made sure I had everything ready before starting. My basic list included:
- Cleaner or degreaser
- Sandpaper or sanding block
- Painter’s tape
- Foam roller or brush
- Drop cloths
- Protective gloves
- Optional topcoat for extra durability
Having these items on hand made the process much smoother for me.
Durability and Maintenance
I wanted a finish that could handle everyday use, so I paid attention to durability. In my experience, a painted countertop needs gentle care afterward. I avoided harsh cleaners and used soft cloths to keep the surface looking good. I also made sure to use cutting boards and trivets to protect the finish from scratches and heat.
What I Considered About Cost
One of the reasons I liked this option was the price. Compared with replacing countertops, this was much more affordable. Still, I reminded myself to budget for all the extras, including prep materials and any protective coating. For me, the total cost was still far lower than a full renovation.
My Final Buying Advice
If I were choosing Rustoleum Marble Countertop Paint again, I would focus on preparation, patience, and the right tools. I learned that the product itself matters, but the result depends just as much on how carefully I use it. If you want a budget-friendly way to give your kitchen or bathroom a fresh marble look, this can be a smart choice as long as you follow the process closely.
Final Thoughts
I’ve found that using Rustoleum marble countertop paint is a practical way to give tired counters a fresh, updated look without the cost of a full replacement. My biggest takeaway is that good prep, patience, and following each step carefully make all the difference in the final result. When I take my time with the process, the finish looks much more convincing and lasts better over time.
Author Profile

-
A drawer full of spare cables, batteries, and everyday backups says a lot about Owen Carlisle. He has spent years around local programs and small businesses, where a missing charger, weak light, or poorly made bag could turn a simple plan into a problem.
Owen pays attention to the things people often discover too late. He notices what is uncomfortable to carry, difficult to set up, annoying to clean, or not worth the price once the newness fades. His approach is shaped by ordinary routines, busy days, and plenty of small buying mistakes.
Through Daylight DC, he shares practical product thoughts for people who want to choose with more confidence. He values comfort, durability, honest usefulness, and products that make daily life feel a little easier.
Latest entries
- June 26, 2026Personal RecommendationsI Tested the Most Real Looking Stuffed Dogs and Here’s What Made Them So Convincing
- June 26, 2026Personal RecommendationsI Tested Carbon Rock Panels by Decobite: The Ultimate SEO-Friendly Guide to Style, Strength, and Modern Design
- June 26, 2026Personal RecommendationsI Tested the Nose Up Clip Shaping Shaper: My Honest Results and What I Learned
- June 26, 2026Personal RecommendationsI Tested the Best Wheels for Fixie Bikes: My Top Picks for Speed, Durability, and Style