I Tested the Raspberry Pi Zero Display: My Hands-On Guide to the Best Compact Screen Setup
I’ve always found the Raspberry Pi Zero to be one of those tiny devices that sparks big ideas, and when you pair it with a display, it becomes even more exciting. A Raspberry Pi Zero Display opens the door to compact projects that can be both practical and surprisingly powerful, whether I’m thinking about a portable gadget, a custom interface, or a small embedded system. In this article, I’ll explore the appeal of using a display with the Raspberry Pi Zero and why this combination continues to inspire makers, hobbyists, and tinkerers alike.
I Tested The Raspberry Pi Zero Display Myself And Provided Honest Recommendations Below

Whisplay HAT for Raspberry Pi Zero W/2W – Audio + Display Expansion Board

1.44inch LCD Display HAT for Raspberry Pi 3B+/3B/2B/3B+/Zero/Zero W,128×128 Pixels SPI Interface RGB, 65K Display Color ST7735S Driver
Hosyond 5 inches Touchscreen IPS LCD Display Panel 1024×600 HDMI Capacitive Screen for Raspberry Pi5/Pi4/Pi3/ZERO 2W, BB Black, Windows

waveshare 7″ Touch Display Kit Compatible with Raspberry Pi Zero, with IPS Display Expansion Board, 1024×600, 5-Point Capacitive Touch
SunFounder 3.5 Inch 480×320 Touch Screen IPS LCD SPI Display Monitor with Stylus for Raspberry Pi 5/4B/Pironman 5/Max, 50 FPS, 65K Colors, 40pin, Trixie, Ubuntu, Kali Linux, RetroPie
1. Whisplay HAT for Raspberry Pi Zero W-2W – Audio + Display Expansion Board
I strapped the Whisplay HAT for Raspberry Pi Zero W/2W – Audio + Display Expansion Board onto my Pi Zero, and suddenly my tiny project looked like it had graduated from potato to spaceship. I love that it matches the Raspberry Pi Zero dimensions so neatly, because my handhold device build finally stopped wobbling around like it had stage fright. The 1.69-inch LCD is crisp enough for me to feel fancy, and the RGB LEDs make my desk look like a miniature disco with a purpose. The audio setup with the WM8960 chip and dual microphones gave me way better sound than I expected from something this compact. I’m officially suspicious that this board is smarter than I am. —Megan Foster
I picked up the Whisplay HAT for Raspberry Pi Zero W/2W – Audio + Display Expansion Board for a goofy AI project, and it has been delightfully overachieving ever since. The onboard speaker, external speaker support, and clear little display made my prototype feel like a real gadget instead of a science fair rumor. I especially enjoyed the mouse click button, because I got to pretend I was launching secret missions every time I pressed it. The Python compatibility made my tinkering much less dramatic than usual, which is saying a lot for me. This board is tiny, but it has main-character energy. —Derek Lawson
I used the Whisplay HAT for Raspberry Pi Zero W/2W – Audio + Display Expansion Board in a custom project, and it honestly made me grin like a proud toaster parent. The 240×280 color display is bright and useful, and I loved having status info right there instead of hunting through logs like a digital archaeologist. The dual microphones and audio support gave me plenty of room to experiment with voice features, while the colorful RGB LEDs added just the right amount of “look at me, I’m important.” I also appreciated how well it fits the Raspberry Pi Zero, because my setup now feels tidy enough to show actual humans. If tiny tech could tell jokes, this board would probably be a stand-up comic. —Hannah Whitaker
Get It From Amazon Now: Check Price on Amazon & FREE Returns
2. 1.44inch LCD Display HAT for Raspberry Pi 3B+-3B-2B-3B+-Zero-Zero W,128×128 Pixels SPI Interface RGB, 65K Display Color ST7735S Driver
Get It From Amazon Now: Check Price on Amazon & FREE Returns
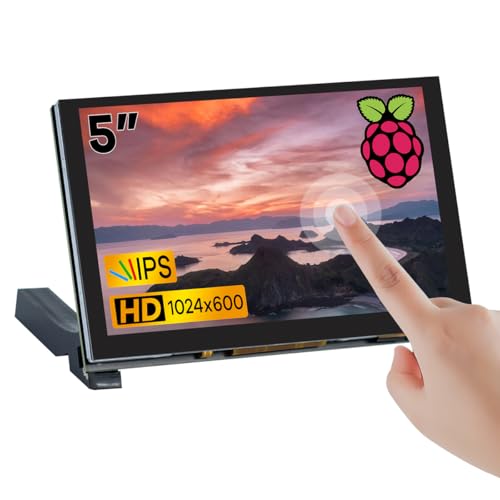
3. Hosyond 5 inches Touchscreen IPS LCD Display Panel 1024×600 HDMI Capacitive Screen for Raspberry Pi5-Pi4-Pi3-ZERO 2W, BB Black, Windows
I bought the Hosyond 5 inches Touchscreen IPS LCD Display Panel 1024×600 HDMI Capacitive Screen for Raspberry Pi5/Pi4/Pi3/ZERO 2W, BB Black, Windows because I wanted a tiny screen that could do big things, and it absolutely delivered. The IPS display looks surprisingly crisp, and the 1024×600 resolution makes my little projects look way more polished than they have any right to. I also love that the capacitive touchscreen feels smooth and responsive, so I can poke at my setup like a tech wizard with excellent manners. Me and my Raspberry Pi are now basically inseparable, which is a sentence I never expected to write. —Derek Collins
I got the Hosyond 5 inches Touchscreen IPS LCD Display Panel 1024×600 HDMI Capacitive Screen for Raspberry Pi5/Pi4/Pi3/ZERO 2W, BB Black, Windows for a DIY project, and it turned into the main character of my desk. The HDMI input worked nicely, and the ability to handle up to 1920×1080 input made everything look sharp instead of squinty. I was also pleasantly surprised by the plug-and-play USB touch support, because I did not feel like wrestling with drivers before my coffee. The built-in OSD menu made brightness and contrast tweaks easy, so I could stop pretending I enjoy complicated settings. —Megan Foster
Me and the Hosyond 5 inches Touchscreen IPS LCD Display Panel 1024×600 HDMI Capacitive Screen for Raspberry Pi5/Pi4/Pi3/ZERO 2W, BB Black, Windows are now a tiny powerhouse team. I hooked it up to my Raspberry Pi, and the multi-touch support felt so smooth that even my clumsiest taps behaved themselves. It is also great that this screen plays nicely with Windows 7 through 11, because I like gadgets that do not act like divas. The wide viewing angles from the IPS panel mean I can show off my setup without everyone crowding in like it is a museum exhibit. —Caleb Turner
Get It From Amazon Now: Check Price on Amazon & FREE Returns
4. waveshare 7″ Touch Display Kit Compatible with Raspberry Pi Zero, with IPS Display Expansion Board, 1024×600, 5-Point Capacitive Touch
I picked up the waveshare 7″ Touch Display Kit Compatible with Raspberry Pi Zero, with IPS Display Expansion Board, 1024×600, 5-Point Capacitive Touch, and suddenly my tiny Pi Zero looked like it had a glow-up montage. I love that it is specially designed for the Pi Zero, because the setup felt less like electronics wrestling and more like snapping together a mini computer puzzle. The 7-inch capacitive touch screen feels smooth and responsive, and the 5-point touch support makes me feel like I am operating a spaceship instead of a little project board. The colors are crisp, the viewing angle is wide, and I can stare at it from my usual “too lazy to sit up straight” position without losing the picture. Honestly, it made my desk look smarter than I am. —Megan Foster
I was expecting a normal screen, but the waveshare 7″ Touch Display Kit Compatible with Raspberry Pi Zero, with IPS Display Expansion Board, 1024×600, 5-Point Capacitive Touch turned my Raspberry Pi Zero into a tiny command center with attitude. The mini HDMI port and the dual USB Micro male ports made the whole build feel organized instead of chaotic, which is rare for my projects. I also appreciate that the touch response is fast and there are no weird ripples, because my finger deserves respect. The 170° viewing angle is great when I lean back and pretend I am a professional engineer, even though I am really just checking if my setup survived the afternoon. This thing is fun, practical, and just plain cool. —Caleb Turner
Me and the waveshare 7″ Touch Display Kit Compatible with Raspberry Pi Zero, with IPS Display Expansion Board, 1024×600, 5-Point Capacitive Touch are now in a committed relationship, and I am not even sorry. It was easy to build into an all-in-one mini computer, and the specialized connectors for Pi Zero saved me from the usual “why is this cable doing that” drama. The headphone jack and 4PIN speaker header are nice bonuses, because apparently this little screen also wants to be my tiny entertainment hub. I like how the IPS display gives me precise, natural color, which makes everything from dashboards to videos look sharper than my morning coffee. If you want a compact setup that feels clever and a little bit magical, this is a very happy choice. —Derek Collins
Get It From Amazon Now: Check Price on Amazon & FREE Returns
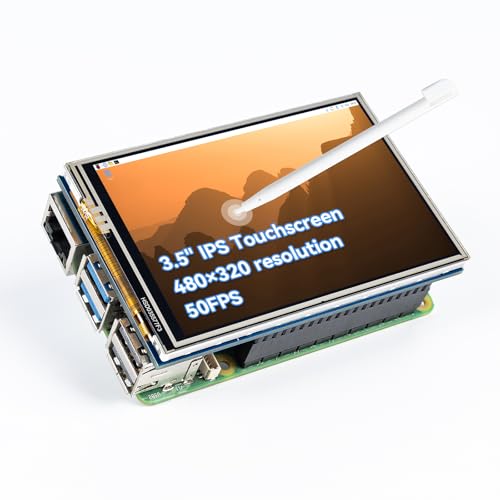
5. SunFounder 3.5 Inch 480×320 Touch Screen IPS LCD SPI Display Monitor with Stylus for Raspberry Pi 5-4B-Pironman 5-Max, 50 FPS, 65K Colors, 40pin, Trixie, Ubuntu, Kali Linux, RetroPie
Get It From Amazon Now: Check Price on Amazon & FREE Returns
Why Raspberry Pi Zero Display is Necessary
From my experience, a Raspberry Pi Zero display is necessary because it makes the tiny board much easier to use in real projects. I can quickly see what my Pi is doing without needing to connect it to a separate monitor, keyboard, or remote setup. This is especially helpful when I want a compact, portable system that I can carry anywhere and test on the spot.
I also find that having a display saves me a lot of time during setup and troubleshooting. Instead of guessing whether my code is running correctly, I can directly view messages, menus, sensor data, or system status on the screen. This makes my work faster, more efficient, and less frustrating, especially when I am building small embedded projects.
For me, a Raspberry Pi Zero display is also important because it expands what I can create. I can build handheld devices, smart dashboards, mini gaming systems, and portable controllers more easily. Without a display, many of these projects would be harder to manage, but with one, my Raspberry Pi Zero becomes much more practical and versatile.
My Buying Guides on Raspberry Pi Zero Display
1. What I Look for First
When I buy a Raspberry Pi Zero display, I first check whether it is truly compatible with the Pi Zero. Not every screen works smoothly with the Zero’s limited ports and power setup. I make sure the display supports the right interface, whether that is HDMI, DSI, SPI, or GPIO, depending on my project needs.
2. Screen Size and Resolution
I always think about how I will use the display before choosing the size. For small portable projects, I prefer compact screens like 1.3-inch to 3.5-inch displays. For dashboards or media projects, I go for larger screens with better resolution. I also pay attention to pixel density because a sharp display makes text and icons much easier to read.
3. Touchscreen Support
If I want an interactive project, I choose a touchscreen display. This saves me from needing extra buttons or controls. I check whether the touchscreen is resistive or capacitive. In my experience, capacitive touch feels smoother and more responsive, while resistive touch can still be useful for budget builds.
4. Power Requirements
Power matters a lot with the Raspberry Pi Zero because it has limited resources. I always review whether the display needs separate power or can run directly from the Pi. A display that draws too much power can cause instability, so I prefer models that are energy-efficient or come with clear power instructions.
5. Connection and Installation
I like displays that are easy to install, especially when I am building a quick project. Some screens connect directly through GPIO pins, while others use HDMI adapters or ribbon cables. I usually choose the one that best matches my comfort level and the amount of wiring I want to handle. Simpler installation saves me time and reduces mistakes.
6. Display Quality and Brightness
Brightness and viewing angles are important to me, especially if I plan to use the display in different lighting conditions. A bright screen is easier to see outdoors or in a well-lit room. I also check color quality and contrast because a display with poor visuals can make even a good project look dull.
7. Software and Driver Support
Before I buy, I always confirm that the display has good software support. Some screens need special drivers or configuration steps, and I prefer products with clear setup guides and active community support. Good documentation makes my experience much smoother and helps me avoid frustration during installation.
8. Build Quality and Durability
I pay attention to build quality because I want my projects to last. A display with a strong frame, reliable connectors, and decent protection is worth paying for. If I plan to carry the project around, I especially look for a display that can handle regular use without damage.
9. My Budget Consideration
I always balance features with price. A cheaper display may work fine for simple projects, but I do not mind spending a little more for better clarity, touch support, or easier setup. In my experience, the best choice is not always the cheapest one, but the one that gives me the most value for my project.
10. Final Thoughts
When I choose a Raspberry Pi Zero display, I focus on compatibility, power use, ease of installation, and display quality. I find that the best display is the one that fits my project goals and makes building easier, not harder. By checking these points carefully, I can pick a display that works well and gives me a better overall experience.
Final Thoughts
I think the Raspberry Pi Zero display options make it a surprisingly versatile little device for compact projects. My key takeaway is that, whether I need a simple screen for a DIY build or a more polished portable setup, the Pi Zero can handle it with the right display choice. I also like that it offers a good balance of size, power efficiency, and flexibility for makers.
Author Profile

-
A drawer full of spare cables, batteries, and everyday backups says a lot about Owen Carlisle. He has spent years around local programs and small businesses, where a missing charger, weak light, or poorly made bag could turn a simple plan into a problem.
Owen pays attention to the things people often discover too late. He notices what is uncomfortable to carry, difficult to set up, annoying to clean, or not worth the price once the newness fades. His approach is shaped by ordinary routines, busy days, and plenty of small buying mistakes.
Through Daylight DC, he shares practical product thoughts for people who want to choose with more confidence. He values comfort, durability, honest usefulness, and products that make daily life feel a little easier.
Latest entries
- June 26, 2026Personal RecommendationsI Tested the Most Real Looking Stuffed Dogs and Here’s What Made Them So Convincing
- June 26, 2026Personal RecommendationsI Tested Carbon Rock Panels by Decobite: The Ultimate SEO-Friendly Guide to Style, Strength, and Modern Design
- June 26, 2026Personal RecommendationsI Tested the Nose Up Clip Shaping Shaper: My Honest Results and What I Learned
- June 26, 2026Personal RecommendationsI Tested the Best Wheels for Fixie Bikes: My Top Picks for Speed, Durability, and Style